
VR Module · Biology · Sciences
Internal Structure of Dicot & Monocot
Plant Anatomy
See it
Inside the module.
Learning objectives
By the end of this module, students will be able to:
Prepare a thin hand section and stain it with safranin to highlight lignified plant tissues
Mount the stained section and examine it under the compound microscope
Identify the tissue layers - epidermis, cortex, endodermis, vascular bundles, and pith
Distinguish a dicot stem (vascular bundles in a ring, open) from a monocot stem (scattered, closed)
Compare dicot and monocot roots by their xylem and phloem arrangement
Relate internal structure to function and to standard plant-anatomy theory
See the plan of a stem and root, layer by layer.
Comparing the internal structure of dicot and monocot stems and roots is a foundational plant-anatomy practical. This module recreates it in VR: students prepare a thin section, stain it, mount it, and study the arrangement of tissues under the microscope - the same workflow as a traditional botany lab, repeatable as often as they like.
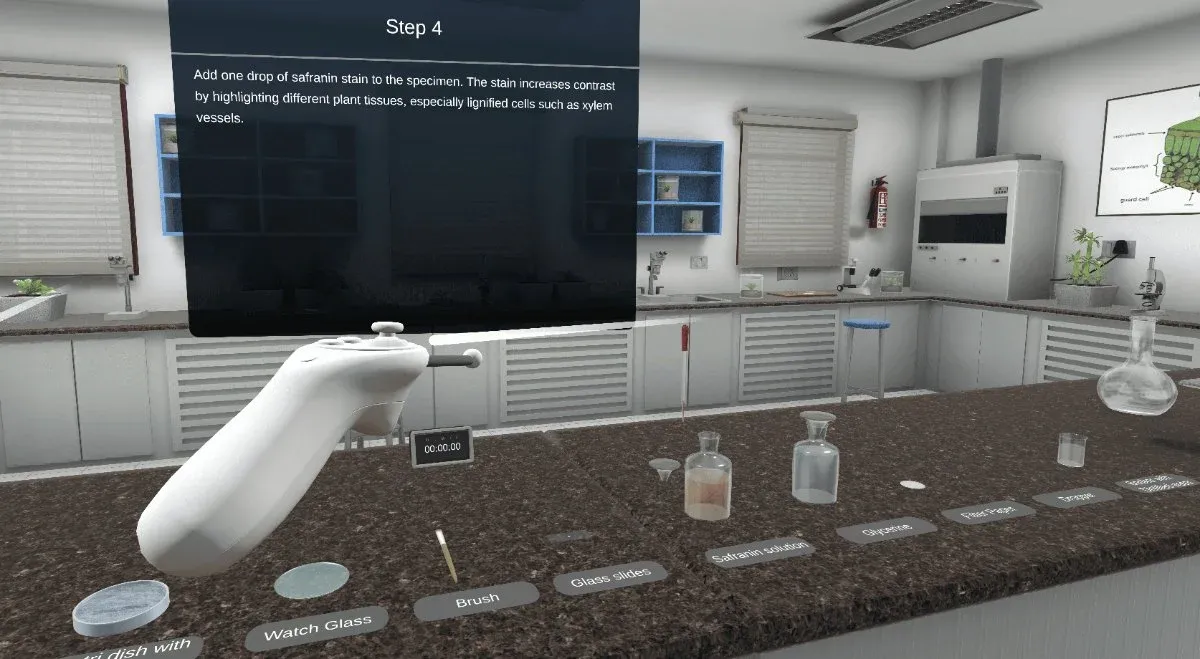
Learners are guided through each step - sectioning, adding a drop of safranin to raise contrast in lignified cells such as xylem vessels, mounting in glycerine, and viewing the slide. They then identify the epidermis, cortex, endodermis, vascular bundles, and pith, and read the tell-tale differences: a dicot stem shows vascular bundles in an open ring, while a monocot stem shows them scattered and closed.
Why a virtual botany practical?
- A good hand section is a skill, and students get very few attempts before the specimen supply runs out.
- Stains and slides are consumables, so repetition is limited by budget rather than by learning need.
- The dicot and monocot comparison is far clearer when both sections can be viewed side by side on demand.
- Students can repeat the preparation until the workflow is automatic, then focus on identification.
The practical, step by step
- Prepare a thin hand section
- Add a drop of safranin to raise contrast in lignified tissue
- Mount the section in glycerine
- View the slide under the compound microscope
- Compare dicot and monocot sections side by side
Concepts it makes tangible
- The tissue layers - epidermis, cortex, endodermis, vascular bundles, pith
- Dicot stem - vascular bundles in an open ring
- Monocot stem - bundles scattered and closed
- Dicot versus monocot root arrangement
- How internal structure relates to function
- Why staining reveals xylem and other lignified cells
How faculty use it
- Pre-lab preparation before the real botany practical
- Unlimited repeats with no specimens, stains, or slides
- Practical revision and demonstration
- Assessment of identification and comparison
Because it is virtual, students can repeat the preparation and comparison without consuming specimens, stains, or slides - ideal for pre-lab preparation, practical revision, and demonstrations. The 7thi AI tutor is on hand throughout, and built-in assessment shows faculty who has grasped each concept.
How the module works
Students carry out the full plant anatomy practical. They prepare a thin hand section of a stem or root, add a drop of safranin to raise contrast, mount the section in glycerine, and examine it under the compound microscope. The module lets them place dicot and monocot sections side by side, so the key difference - vascular bundles in an open ring in the dicot, scattered and closed in the monocot - is something the student verifies rather than takes on trust. Because no specimens, stains or slides are consumed, the whole preparation can be repeated until the workflow is automatic.
What students take away
A student can prepare, stain and mount a plant section, identify the epidermis, cortex, endodermis, vascular bundles and pith in both stem and root, and reliably distinguish dicot from monocot internal structure. They understand why safranin is used and what it stains, which links the preparation technique to the tissue chemistry it reveals.
In the classroom
Plant-anatomy courses use the module as pre-lab preparation and as a way to give students far more attempts at sectioning and identification than a limited specimen supply allows. Agriculture, horticulture and forestry programmes use it to build the tissue-recognition skills their fieldwork depends on, and it serves as revision before a practical examination where students must identify structures under time pressure.
Interactive features and modes
Students carry out the full practical - preparing a thin section, staining with safranin, mounting in glycerine and examining under the compound microscope - and can place dicot and monocot sections side by side to compare them directly. The preparation can be repeated without consuming specimens, stains or slides, so students can practise the workflow until it is automatic and then concentrate on identification.
Why it matters
Distinguishing dicot from monocot internal structure is a core plant-anatomy skill, and it depends on producing a good hand section and reading it correctly - both of which take practice. In a real lab, stains and slides are consumables and specimen supply is limited, so students get very few attempts before the material runs out. A virtual practical removes that ceiling, letting every student prepare, stain and compare sections as often as they need before a practical exam.
The bigger picture
The dicot-monocot distinction is a gateway to understanding plant structure and function more broadly, because the arrangement of vascular tissue reflects how a plant grows, supports itself and transports water and nutrients. Learning to recognise the open ring of a dicot and the scattered bundles of a monocot - and to produce a section clean enough to see them - takes repetition that consumable specimens ration tightly. A virtual practical removes that ceiling, letting students prepare, stain and compare until both the technique and the recognition are secure.
Devices, deployment and assessment
Deploying the module is straightforward. It runs on Meta Quest, ClassVR and Pico headsets, on WebXR-compatible browsers, and on the desktop without any headset at all, so a department can start with the hardware it already has and scale as it grows. Faculty can assign the whole module or specific scenes, set it as pre-lab preparation or post-lab revision, and track progress on a dashboard that records concepts mastered, time per scene and assessment scores, with export to the LMS via xAPI. The 7thi AI tutor answers student questions in context throughout, so learners are never left stuck and faculty are not fielding the same question forty times.
Who this module is for
- Biology and botany undergraduates from Year 1 studying plant anatomy
- Agriculture, horticulture and forestry programmes
- Life sciences students preparing for a practical exam
- Faculty running pre-lab preparation before the real botany practical
Syllabus alignment
Where this module fits.
UGC / NEP 2020
Supports experiential, digital, multidisciplinary, and skill-based learning in Botany, Life Sciences, and Biology practicals - useful as a virtual lab component for plant anatomy.
NAAC / Outcome-Based Education
Evidences ICT-enabled teaching, repeatable practical work, and improved access to lab-based education, supporting practical learning outcomes and student engagement.
University syllabi
Maps to B.Sc. Botany, Life Sciences, and Plant Anatomy practical syllabi - including practical objectives, lab-record outcomes, viva preparation, and assessment rubrics. Request a custom mapping.
Lab Resources & Access
Reduces dependence on microscopes, stains, reagents, and prepared slides, giving every student unlimited, repeatable practice - useful where lab time or consumables are limited.
Keep exploring
Related modules.
See Internal Structure of Dicot & Monocot live in a demo.
Thirty minutes, the full module, your curriculum questions answered.
What does the practical involve?
Preparing a thin hand section, adding a drop of safranin to raise contrast, mounting the section in glycerine, viewing the slide under the compound microscope, and comparing dicot and monocot sections side by side.
What is the key difference students learn to spot?
A dicot stem shows vascular bundles arranged in an open ring, while a monocot stem shows them scattered and closed. The module lets students verify that pattern themselves rather than take it on trust.
Why is safranin used, and does the module explain it?
Yes. Safranin raises contrast by staining lignified cells such as xylem vessels, which is why the vascular tissue stands out from the surrounding parenchyma once the section is stained.
Which tissue layers are identified?
Epidermis, cortex, endodermis, vascular bundles and pith - in both stem and root, and across both dicot and monocot arrangements.
Is this mapped to our curriculum?
It is mapped to ABET, NBA and equivalent frameworks, and we map it to your own plant anatomy syllabus before deployment. Request a custom mapping.
Can this be used in a flipped classroom?
Yes. Students complete Internal Structure of Dicot & Monocot before the lecture, so class time goes on analysis and discussion rather than first exposure to the topic.
Does it integrate with our LMS?
Yes. Moodle, Canvas and Blackboard are supported, with SSO and xAPI export of session data and assessment results.
Can this replace our physical lab?
It precedes and extends the lab rather than replacing it. Students arrive knowing the procedure, so scarce bench time goes on technique instead of familiarisation.
What does the practical involve?
Preparing a thin hand section, adding a drop of safranin to raise contrast, mounting the section in glycerine, viewing the slide under the compound microscope, and comparing dicot and monocot sections side by side.
What is the key difference students learn to spot?
A dicot stem shows vascular bundles arranged in an open ring, while a monocot stem shows them scattered and closed. The module lets students verify that pattern themselves rather than take it on trust.
Why is safranin used, and does the module explain it?
Yes. Safranin raises contrast by staining lignified cells such as xylem vessels, which is why the vascular tissue stands out from the surrounding parenchyma once the section is stained.
Which tissue layers are identified?
Epidermis, cortex, endodermis, vascular bundles and pith - in both stem and root, and across both dicot and monocot arrangements.
Is this mapped to our curriculum?
It is mapped to ABET, NBA and equivalent frameworks, and we map it to your own plant anatomy syllabus before deployment. Request a custom mapping.
Can this be used in a flipped classroom?
Yes. Students complete Internal Structure of Dicot & Monocot before the lecture, so class time goes on analysis and discussion rather than first exposure to the topic.
Does it integrate with our LMS?
Yes. Moodle, Canvas and Blackboard are supported, with SSO and xAPI export of session data and assessment results.
Can this replace our physical lab?
It precedes and extends the lab rather than replacing it. Students arrive knowing the procedure, so scarce bench time goes on technique instead of familiarisation.